I think I spelled it right this time, didn't I? I can never remember which letters to double....
Well, I went there for my second time on Friday with the girls and a couple of guys, and again it was amazing. I actually tried something besides the duck, which is a cardinal sin, but it was a wonderful meal anyway! I've posted this before, but the duck is to die for there. I think it's amazing, which is why I wanted to try something else....there has to be more amazing stuff on the menu, doesn't there? In hindsight, I shouldve gotten the duck as I ate some of Bea's instead of finishing my meal...but I think I will try one more thing there next time I go, before I head straight back to the duck and never get anything else. Christina will never order anything else but the duck so here is a picture of hers...Pan roasted Fox Hollow Farms duck breast/ duck confit/ shitake & tart cherry risotto/ duck demiglaze!
I tried the spicy duck wings for my appetizer and would highly recommend those as well. I've had the scallops appetizer there and it's hard to beat but it's also pretty pricey at $13 for 2 scallops! So I wanted to try something different and was glad I did...I actually had the waiter pick my appetizer for me and it turned out he brought me the one I wouldve ordered from the 3 I had him choose from.
For my meal, I had the skate wing, which is described as Sauteed skate wing/ seafood polenta/ saffron nage...and it was very, very good! Skate wing is a stingray, and it was a little fishier than I had expected but the seafood polenta was amazing. Not a great picture but here it is...I would probably not order it again but am glad I tried it, not everyone has had a chance to eat stingray!
Tony actually picked really well that night too, and he got something I wouldve considered boring normally. He got the Pasta carbonara/ linguine/ sherry cream sauce/ peas/ crisp bacon....can I tell you that Ive never seen bacon this thick. It was a very, very rich and bacon-y dish so if you don't like bacon, don't touch it but man, was it delish!! It had peas in it, which I despise, and I still couldnt stop stealing bites! We were in a dark basement...great for ambiance, not so great for food pics...so excuse the darkness of the photos.
And last but not least, we come to Brandy Sue. She would highly recommend the candied walnut salad, as she doesn't really get off on food like the rest of us do and doesn't like to pay an arm and a leg for a meal that she doesn't love...she would probably pay more for spinach artichoke dip from Wallaby's than any duck, steak, or fish in the world! But that's why we love her :)
I should mention that we also finished off 3 bottles of wine with dinner (and the boys were mostly drinking beer), which I wouldn't recommend. They do have some decent deals on wine though, considering how expensive the food is there. Nights like these are so fun to me...great food and wine, great friends, a nice long dinner to chit chat and hang out....can't really beat that in my book!
Chronicling the adventures of a 30-ish food lover and avid runner/biker as she tries to balance her love for fat kid food while not sacrificing taste for health...everyday cooking at its most simple.
Tuesday, June 28, 2011
Creamy taco mac
I'll be the first to tell you that this is not a fancy dish...tastes a lot like hamburger helper. This means it would be great for kids (Justin and Curt liked it, haha) and is easy to throw together....but it's made with ground turkey so its better for you than hamburger helper would be!
I got this off of a blog that a friend sent to me called Babies and Broccoli (http://www.babiesandbroccoli.blogspot.com/), she's got some great recipes on there and I've used quite a few of them.
1 lb ground turkey
8 oz dry pasta (I just used elbow macaroni since I had it in the cupboard)
1 small onion
1 clove garlic minced (I used 2)
1 (14 oz) can diced tomatoes (I used Rotel with diced chiles in it)
package of taco seasoning
1/2 an 8 oz container of cream cheese (I used fat free)
1/2 cup sour cream (I used fat free)
shredded cheddar cheese (optional, I used a little bit of 2% mexican cheese)
salt and pepper to taste
Here's a little lesson on ground turkey that I had to learn. The normal ground turkey is not much better for you than hamburger is, especially if you get the lean hamburger. It's more expensive so there's really no reason to splurge for it. You have to be sure that you are getting white meat ground turkey, so its 98% fat free and a lot lower in calorie. The problem with this is it's very expensive, I've paid between $3.50 and $5 per pound before. I still really like to eat pasta with lower calorie count so I go with the turkey most of the time...but that choice is up to you.
Sooooo, here we go. Bring a large pot of water to boil. Cook the pasta according to the package instructions and drain, reserving a 1/2 cup of the pasta water for later.
Meanwhile, in a large skillet, cook the ground turkey over medium-high heat. A few minutes before the turkey is cooked through, add the chopped onion to the skillet. Once it's all cooked, add the minced garlic and cook until fragrant, about 30 seconds. You shouldnt have to drain turkey if you're using white meat, there usually isn't any grease to drain. Mix in the diced tomatoes and taco seasoning and let simmer over medium heat for 5 minutes.
Stir in the cooked pasta, cream cheese, sour cream, and reserved water. Continue stirring until the cheeses are melted and blended. Season with salt and pepper, and top with cheese if desired.
I would probably add a jalapeno next time to spice it up a little more but crushed red peppers worked well for that too. This is a very simple weekday recipe...
Someone on my facebook asked for nutrition information and although none was provided, here are my estimations: 30 cals for cream cheese, 25 for sour cream, 211 for ground turkey, 160 for pasta, 20 for taco seasoning, 15 for tomatoes=461 calories and I always round up. That is under 500 calories per serving when splitting this into 4 servings (which is plenty).
Monday, June 27, 2011
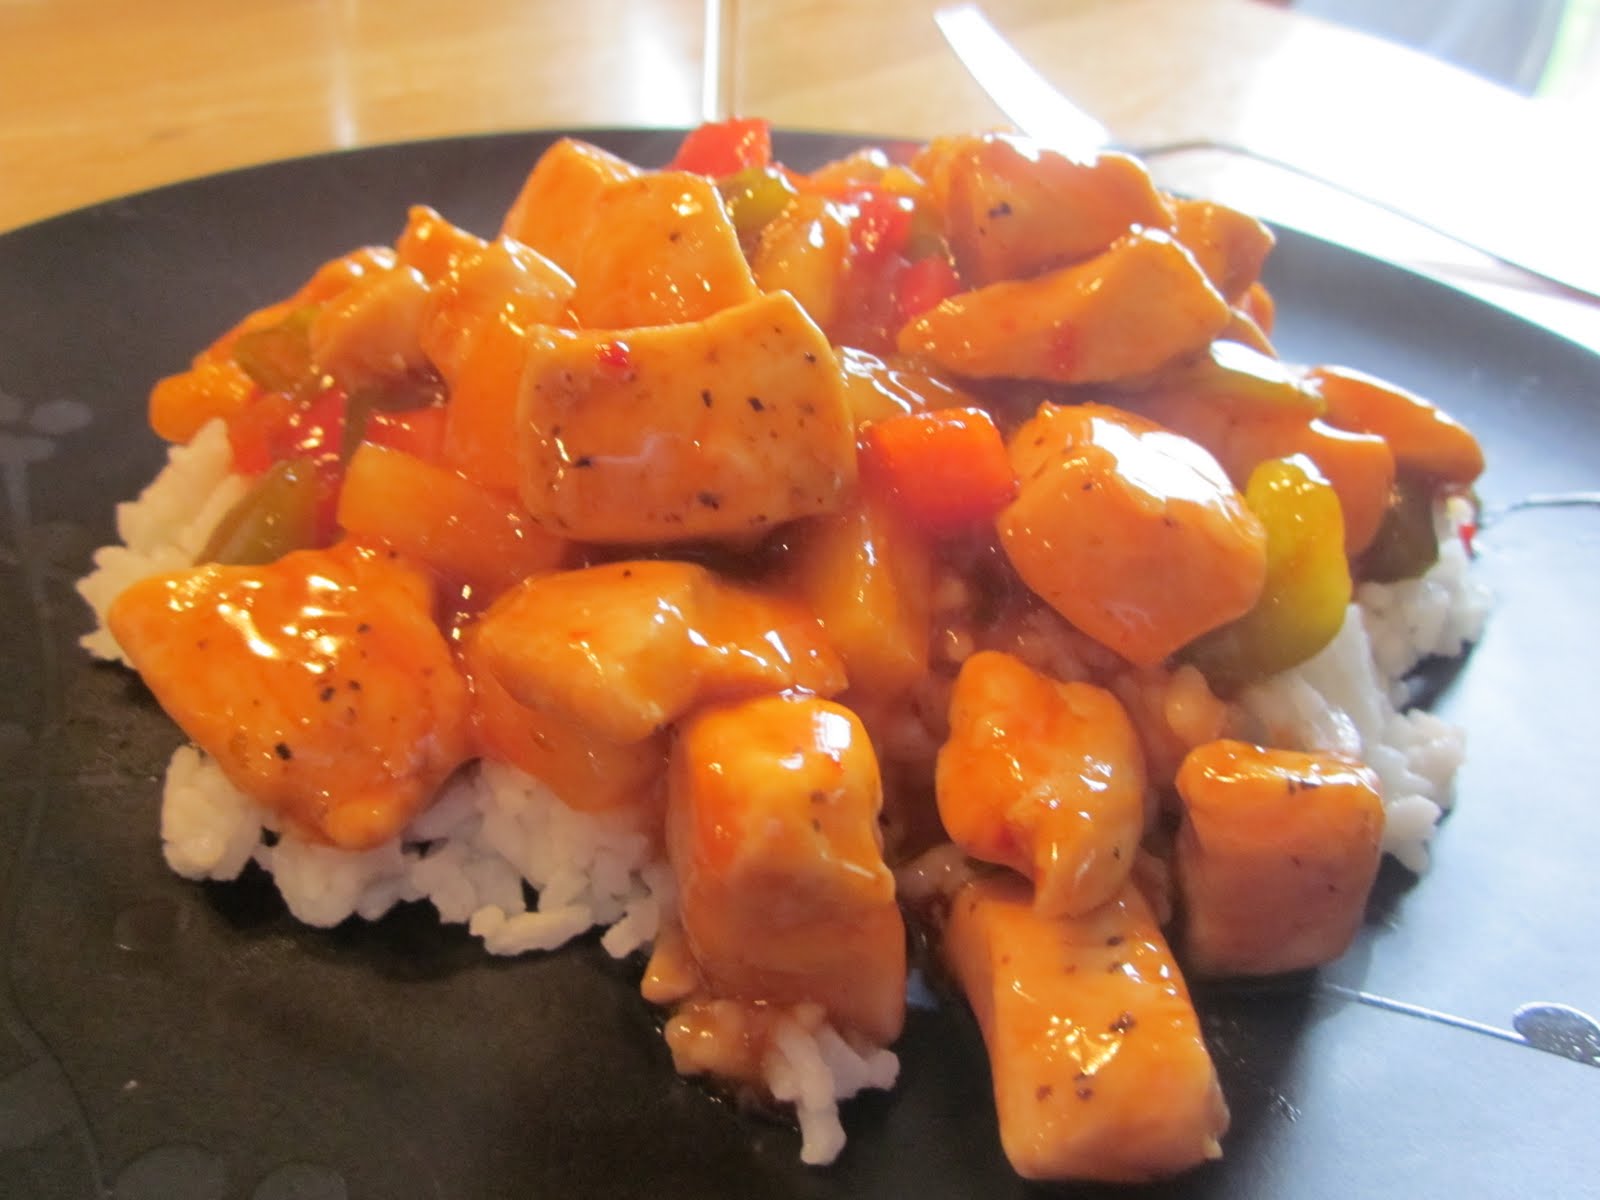
Sweet and Sour Chicken
Another recipe from Mrs. Mohr is being added to the list! When we went over for a girl's dinner last week, she made this for us and it was a hit...Brandy Sue even went up for seconds (that's an accomplishment for anyone making dinner)! I admit, I didn't think I was a fan of sweet and sour anything...I worked in a Chinese restaurant when I was in high school and I never liked the looks of any of the sweet and sour dishes. I sure am glad I gave this a try though...its a great substitute to the calorie packed takeout version as she healthified this recipe right up.
She took this pic of the ingredients for me since she knew I would be blogging this and I wasn't there when she started the preparation...what good friends I have! :)
Here is what you will need:
3-4 boneless skinless chicken breasts (chopped into cubes)
2 bell peppers, diced (any color you prefer)
2 cups of pineapple
2 containers La Choy sweet and sour sauce
steamed rice prepared with the box directions
1 onion diced (she didn't add this because we have a certain Christina who doesn't like onions)
salt and pepper to taste
Start by spraying your skillet with nonstick fat free Pam and adding the chicken to medium heat, seasoned with salt and pepper. When the chicken is done, add the veggies and pineapple and saute together for 5 minutes while stirring sporadically.
Add the sauce and simmer for 5-10 minutes so the flavors can meld. Add 1 T of cornstarch mixed with a bit of water to thicken the sauce up.
Serve over a bed of white rice and don't worry about going back for seconds like Brandy did...you will devour this!
P.S. If I relayed any of this incorrectly, let me know, Michelle!! Thanks for another great meal :)
Friday, June 24, 2011
Strawberry sour cream ice cream
If you haven't noticed that the dessert section is a little light, you're probably like me and don't even check that section. I would much rather eat more for dinner than worry about dessert but sometimes I do get the urge to throw something together for a special occasion. My go-to dessert is mini-cheesecakes that I will probably get on here in a couple weeks when I make them for our 4th of July party...those are yummy and fat free!
I don't know what happened to me the other day at the grocery store but I got a hankering to buy this ice cream machine that I've seen there a couple of times before that. I think it was a combo of wanting to use my new food processor, wanting to make Gary homemade ice cream for father's day since Justin has told me he used to make it for them as kids, and me seeing this recipe on a new blog I am following called "Dainty Chef" (http://www.daintychef-krissy.blogspot.com/) and wanting to try it.
Little did I know that I bought the world's smallest ice cream maker...but that's ok. It's the perfect size for J and I, this recipe just made me about 3 batches in that ice cream maker.
1 lb fresh strawberries, rinsed and sliced
3/4 cup sugar
1 T of vodka
Add those 3 ingredients together and set them aside at room temp for an hour...I didn't know what difference this would make but here is a before and after photo so you can see the strawberry infused sugary sauce it makes when letting it sit....
When this step is done, you add the mixture to your food processor, and add these ingredients as well...
1 cup sour cream
1 cup heavy cream
1 t lemon juice
I was totally confused about vodka and sour cream being added to ice cream but I thought it was worth a shot. Pulse briefly until almost smooth but still slightly chunky.
This is when you follow the directions of your ice cream maker. Mine has 2 frozen bowls that attach to the churning top, so I grabbed one out of the freezer, filled it up to the line with my strawberry mixture, and let it go at it for about 15 minutes. It came out perfectly softserved like you would get at a frozen yogurt store...but I had to make another bowl so I threw that one in the freezer and used the other frozen bowl to make the second batch.
I don't know what happened to me the other day at the grocery store but I got a hankering to buy this ice cream machine that I've seen there a couple of times before that. I think it was a combo of wanting to use my new food processor, wanting to make Gary homemade ice cream for father's day since Justin has told me he used to make it for them as kids, and me seeing this recipe on a new blog I am following called "Dainty Chef" (http://www.daintychef-krissy.blogspot.com/) and wanting to try it.
Little did I know that I bought the world's smallest ice cream maker...but that's ok. It's the perfect size for J and I, this recipe just made me about 3 batches in that ice cream maker.
1 lb fresh strawberries, rinsed and sliced
3/4 cup sugar
1 T of vodka
Add those 3 ingredients together and set them aside at room temp for an hour...I didn't know what difference this would make but here is a before and after photo so you can see the strawberry infused sugary sauce it makes when letting it sit....
| BEFORE |
| AFTER |
1 cup sour cream
1 cup heavy cream
1 t lemon juice
I was totally confused about vodka and sour cream being added to ice cream but I thought it was worth a shot. Pulse briefly until almost smooth but still slightly chunky.
This is when you follow the directions of your ice cream maker. Mine has 2 frozen bowls that attach to the churning top, so I grabbed one out of the freezer, filled it up to the line with my strawberry mixture, and let it go at it for about 15 minutes. It came out perfectly softserved like you would get at a frozen yogurt store...but I had to make another bowl so I threw that one in the freezer and used the other frozen bowl to make the second batch.
I can't tell you how glad I am that I bought this thing...although my pants probably aren't going to be thanking me. I think it's a perfect portion size for Justin and I (it serves about a pint per frozen bowl) to share if we have a craving, and I'm excited to try all new kinds and maybe even some fro-yos. Anyway, these little desserts turned out just like I wanted, I added some graham cracker crumbs and a piece of milk chocolate to dress these up and serve.
Thursday, June 23, 2011
Strawberry poppyseed salad
This is another recipe I got from my friend Maggie, who got it from someone at her wedding shower. Some of those recipes (like this one) are included in my repeat list, so thanks to whoever added this one! I never used to be a "fruit in the salad" type of person but this just works perfectly as a fresh side dish, and if I add chicken or turkey to it, we've even done this as a full meal.
Romaine (Use whatever lettuce you want but I love romaine, I also added arugula to this one since I had some leftover in the fridge)
quartered strawberries
reduced fat feta cheese
seasoned almonds
Kraft creamy poppyseed dressing
The best part is that there are no amounts so you can mix it how you would like, I just throw what I've got in there until it looks good. I also mixed everything ahead of time, threw it in the fridge, and waited till just before serving to add the dressing and toss it evenly.
This was one of the sides I served for our big Father's day meal.....but go ahead and add some chicken to it if you want some protein to make it a full meal!
Wednesday, June 22, 2011
Asiago roasted potatoes
I'm always looking for a new way to do potatoes as I just love them but feel like I serve them the same way all the time. I've always been a meat and potatoes girl rather than a dessert girl...so anytime I see something intriguing I usually give it a try. I had some asiago cheese leftover from the asiago crusted pork chops so thought I would give this a shot....I found it on a new blog I'm now following called "Ommy Noms" (http://www.ommynoms.blogspot.com/), there are so many people who have great blogs, I could read about new recipes all day long!!
7 medium sized potatoes (I used red)
3 T olive oil
salt and pepper to taste (so LOTS for me!)
3 garlic cloves, minced
3/4 cup shredded asiago cheese
pinch herbes de provence (this was one spice that I didn't have in my kitchen, GASP, so I used rosemary which really brings out the great taste in potatoes...if you've never had rosemary potatoes, you're not livin life the way it should be lived!)
Preaheat the oven to 450 degrees. Cut the potatoes into one inch cubes and place in a medium sized pot. Add water to cover potatoes, add salt to taste and bring to a boil. Cook for 4 minutes once boiling.
Remove potatoes from heat, drain and pat dry.
Pour the potatoes into a large ziplock bag. Add the olive oil, salt and pepper, and garlic cloves to the bag and shake until the potatoes are covered evenly. Pour the mixture onto a nonstick cookie sheet like so....
Roast potatoes 30-45 minutes until tender and brown, stirring every 15 minutes. Transfer to a serving dish and sprinkle on asiago cheese and your rosemary or herbes de provence. These potatoes were very good and seemed fancier than just normal grilled taters....
Grilled corn on the cob with roasted jalapeno butter
This was very simple and had some good flavor to it, but not an overpowering jalapeno flavor by any means. Some people get scared off when they hear the word jalapeno and aren't into hot stuff...I will tell you that I thought this would be hotter than what it was so I was a bit disappointed at first. But the way you cook them will determine the taste you get from them, and roasting will always take the heat out of a pepper. I did learn some things doing this recipe though....
The corn part is easy...just shuck it and throw it on the grill. Turn every so often when you get the grill marks on it, and it should be done in less than 10 minutes for sure. I made the jalapeno butter ahead of time though. Here's what you need:
1 jalapeno pepper
7 t unsalted butter, softened
2 t honey
1 t salt
That is enough butter for 6 ears of corn so if you're doing more than that, double it. Preheat the grill to medium high heat and throw the jalapeno on the grill rack. Grill until blackened or charred, turning every so often to cook evenly.
I almost skipped this step but am glad I didn't. I didn't have a paper bag which is what it calls for...."Place jalapeno in a small paper bag, and fold tightly to seal. Let stand for 5 minutes." I just used a piece of white computer paper and made a little paper bag instead. I discovered the reason behind this is that the paper absorbs the oil or moisture from the skin of the pepper and the skin pulls apart from the flesh of the pepper making it ridiculously easy to skin the pepper. You learn something new every day I guess...
So you discard the stem, seeds, skin, and membrane and dice up the pepper as small as possible. Combine the chopped pepper with the ingredients listed above and stir well. I served this with a brush and left it room temp so it was easy to apply to the ears of corn.
Subscribe to:
Posts (Atom)