Not sure if I've told you that I am now obsessed with Buffalo Wild Wings hot sauces? I don't know why I've never thought to purchase them before, but they are pretty inexpensive and have so many flavors, they are my new thing. This is one for those of you who have told me you don't like to cook anything with more than a couple ingredients...you can't get easier than this.
Soooo, I had some chicken thawed, and on a lazy day just threw the breasts into a tupperware covering them with BWW sauce and let them marinate overnight before thrwoing them on the grill. Wowza, usually chicken cooks off anything it's marinated with pretty well...these were PERFECT! I used the second to the hottest (Wild) mixed with the Spicy Garlic and it was heaven with a piece of swiss cheese melted on it! The buns from Wal Mart probably helped out a bit, or maybe I was just starving, but this was one of the best chicken sandwiches I've ever made! You know when you finish a meal and are just completely satisfied, and don't even want to ruin the taste in your mouth with ice cream after dinner? This did that for me. Not really a recipe...but kind of a suggestion. Try this...as quickly as possible. You won't be disappointed.
I won't go into the fact that I almost burned the house down with the wing sauce dripping into the grill...be sure to move your grill away from your house, people. Either that or make sure you have a fire marshall Justin to run out and douse the flames when needed....
Chronicling the adventures of a 30-ish food lover and avid runner/biker as she tries to balance her love for fat kid food while not sacrificing taste for health...everyday cooking at its most simple.
Thursday, July 21, 2011
Wednesday, July 20, 2011
Veggie omelettes
This is just a throw together but it was so pretty I had to take a picture for you :)
Saturday morning we weren't getting around too quickly (Im sure it had nothing to do with the wine we had celebrating Christina's birthday the night before), and all I was craving was grease! Sooo, I made my way downstairs while Justin was still in and out of sleep to get some breakfast in bed put together.
As I've said, zucchini is going in everything I can fit it in until our garden dies out...it will be coming out our ears before the end of the summer. So I mixed together 6 eggs, some fresh spinach, tomatoes, zucchini, portabellos, leftover chicken sausage, and onions. All of this was found in the fridge from something else I had made. Threw them in the skillet and stirred while hydrating my body...I was SO thirsty! When it was close to done, I topped it with some pepperjack cheese slices and mixed it all up to bring upstairs. Top with Chalula if you're like me and want your eggs to kick a little. Breakfast in bed and then a nap...why can't every day be Saturday?
Saturday morning we weren't getting around too quickly (Im sure it had nothing to do with the wine we had celebrating Christina's birthday the night before), and all I was craving was grease! Sooo, I made my way downstairs while Justin was still in and out of sleep to get some breakfast in bed put together.
As I've said, zucchini is going in everything I can fit it in until our garden dies out...it will be coming out our ears before the end of the summer. So I mixed together 6 eggs, some fresh spinach, tomatoes, zucchini, portabellos, leftover chicken sausage, and onions. All of this was found in the fridge from something else I had made. Threw them in the skillet and stirred while hydrating my body...I was SO thirsty! When it was close to done, I topped it with some pepperjack cheese slices and mixed it all up to bring upstairs. Top with Chalula if you're like me and want your eggs to kick a little. Breakfast in bed and then a nap...why can't every day be Saturday?
Grilled veggie salad
As anyone who has a garden knows, zucchinis are the easiest thing in the world to end up with a million extras to try and give away. I planted 2 plants last year but only one lived for a while due to the flooding, so I planted 4 this year to make sure I had 2 plants live. All 4 lived. Oh, joy...now I have 10 zucchinis a week and throwing away food is not an option for a food hoarder like myself. Sooooo, if you need some, let me know!
Our first crop was picked this weekend so I tried to find ways to use as much of it as possible. I needed a veggie for Friday's dinner and had some other good grilling veggies in the fridge to throw in with zucchini so it worked out perfectly. The veggies were actually my favorite part of the meal!
I had portabellos, a red pepper, some sweet corn (which I cut off the ears), zucchini, and would've done an onion but Christina is not a fan...I threw them in a tin dish with Pam in the bottom, added a bit of olive oil and 2 cloves of fresh minced garlic, salt and pepper, and throw on the grill. You can pretty much throw in any veggie you've got, and just have at it! Easy peasy...and yummy in my tummy! One zucchini down, 80 more to go...
Our first crop was picked this weekend so I tried to find ways to use as much of it as possible. I needed a veggie for Friday's dinner and had some other good grilling veggies in the fridge to throw in with zucchini so it worked out perfectly. The veggies were actually my favorite part of the meal!
I had portabellos, a red pepper, some sweet corn (which I cut off the ears), zucchini, and would've done an onion but Christina is not a fan...I threw them in a tin dish with Pam in the bottom, added a bit of olive oil and 2 cloves of fresh minced garlic, salt and pepper, and throw on the grill. You can pretty much throw in any veggie you've got, and just have at it! Easy peasy...and yummy in my tummy! One zucchini down, 80 more to go...
Tuesday, July 19, 2011
Protein bars
In honor of RAGBRAI, I figured I should post these even though I didn't get a chance to make them myself yet. A friend from my hometown, Jason Lambertz sent me this recipe the other day and I can't wait to try it. I spend so much $ on protein bars and meal bars for workouts or meal replacements throughout the day, that it makes sense to make your own. I don't know why I've never thought of it before...
There won't be any posts until I'm back from RABGRAI next week but I hope to have lots of pictures and good stories to share when I get back! Until then, give these a shot and let me know how you like them!
2 cups quaker oats
1 cup peanut butter
1 cup dark chocolate chips
1 cup vanilla protein powder... i use eas soy protein
1 cup milled flax seed
1 cup honey
Combine all ingredients together until well blended, use wax paper to press down into a 9x13 pan approx 1" thick. Refrigerate. Cut into 2x2 bars.
Thanks, Jason!
Catch you all next week!
There won't be any posts until I'm back from RABGRAI next week but I hope to have lots of pictures and good stories to share when I get back! Until then, give these a shot and let me know how you like them!
2 cups quaker oats
1 cup peanut butter
1 cup dark chocolate chips
1 cup vanilla protein powder... i use eas soy protein
1 cup milled flax seed
1 cup honey
Combine all ingredients together until well blended, use wax paper to press down into a 9x13 pan approx 1" thick. Refrigerate. Cut into 2x2 bars.
Thanks, Jason!
Catch you all next week!
Imperial crab stuffed flounder
So, I learned something this weekend. I do not like flounder. I'm big on most fish, I love salmon even though I can't make it much since Justin doesn't like it, my fave is tilapia, I'm a huge fan of tuna and swordfish, and I really enjoy cod....add to that crab, lobster, shrimp, and most other seafood and I'm usually down for anything. This is the 2nd type of fish that I've tried and just wasn't a big fan of (the first was skate wing at Sborocco...they both just seemed really fishy to me). I know Justin wasn't a fan either, and Christina let Nate finish her plate (he absolutely raved about it for some reason), so it wasn't my best dinner party! Good thing the sides and dessert were good :)
We had Christina and Nate over for dinner and she is a foodie like me, so I thought trying something new would be a good idea. I guess I learned my lesson there! Although I didn't like the actual flounder, I loved the imperial sauce and crab that it was stuffed with...so I would do this again with a different base for the stuffing next time. I think a tilapia or cod would work great as they are pretty mild....
So, here we go...for the imperial sauce:
1/2 cup mayo (I used fat free)
1 large egg (lightly whipped)
1 squeaze fresh lemon juice
1 t sugar
1 t old bay seasoning
6 oz lump crab meat (picture below was before adding the crab)
This recipe is for 2 servings, so I doubled it to serve 4 people...
Mix all the sauce ingredients together until well blended. Place 4 large filets of flounder in your baking dish, and place 1/4th of your filling on top of each filet. Take the remaining 4 filets, and split them in half, placing one half on each side of the stuffing, leaving the top visible. I was super excited to cook these after seeing how they looked in the pan! Place a little water in the pan to keep it from drying out, and cook the fish at 350 dgrees for 25-30 minutes.
This recipe came from the blog of a chef and author called http://www.tablefortwocookbooks.blogspot.com/ and his picture was amazing, I will even post it as a comparison so you can see how embarrassingly wrong mine came out looking. As I've said though, if it tastes good, what does it matter? Except this didn't taste good, haha! If you like flounder, I would recommend this for sure, the crab imperial sauce is amazing. But if you don't like flounder, give it a shot with a more mild fish, as I plan to do!
I had a large amount (I'm talking Sam's Club sized) of fresh spinach that I made a bed out of for this fish and it turned out so well I will be doing that again for our parmesan tilapia this week. I threw a bunch of that in a bowl, added 2 T of light butter, as well as 2 cloves of garlic freshly minced and some cracked pepper, into the microwave to wilt before putting on the plate to set the fish on top of when I plated.
I found myself digging under the fish for some spinach at times it was so tasty, and it was a very nice compliment to the sauce and crab. So, Im sure this is a no-no in the blog world but this is what it was supposed to look like:
And here is what it did look like! Hahahaha....I lose. See what I mean with other people's blogs and their food photography? It's very intimidating, but strangely inspiring! Honestly though, this recipe would have been great had I been a flounder lover...don't let me scare you off from trying it, this guy has some amazing recipes on his blog, and I'm positive that this one will be great with a fish more to my taste preference!
Bacon ranch grilled potatoes
Simple, yummy potatoes. I tend to gravitate toward my rosemary, garlic, and olive oil too much for taters so this sounded great! The recipe is from a blog I follow called Cassie Craves...you can check it out at http://www.cassiecraves.blogspot.com/ if you like!
10-12 baby red potatoes, thinly sliced
6 slices of cooked and crumbled bacon (leftover from BLT's the other night, score!)
1 packet ranch dressing mix
salt and pepper to taste
3 T butter (I used olive oil instead)
fat free sour cream for serving, if desired
Spray your tin foil or grilling pan with PAM before putting anything on it. Toss potatoes in, topping with ranch packet and bacon evenly. Add the butter or olive oil, and salt and pepper. Wrap securely and throw on the grill! The before picture even looks yummy:
Grill for 20-30 minutes, stirring occasionally. Let stand 10 minutes before unwrapping and serving. Because they were sliced so thin, they were nice and crispy and had great flavor. Thank goodness these turned out since the main course was lacking...
10-12 baby red potatoes, thinly sliced
6 slices of cooked and crumbled bacon (leftover from BLT's the other night, score!)
1 packet ranch dressing mix
salt and pepper to taste
3 T butter (I used olive oil instead)
fat free sour cream for serving, if desired
Spray your tin foil or grilling pan with PAM before putting anything on it. Toss potatoes in, topping with ranch packet and bacon evenly. Add the butter or olive oil, and salt and pepper. Wrap securely and throw on the grill! The before picture even looks yummy:
Grill for 20-30 minutes, stirring occasionally. Let stand 10 minutes before unwrapping and serving. Because they were sliced so thin, they were nice and crispy and had great flavor. Thank goodness these turned out since the main course was lacking...
Monday, July 18, 2011
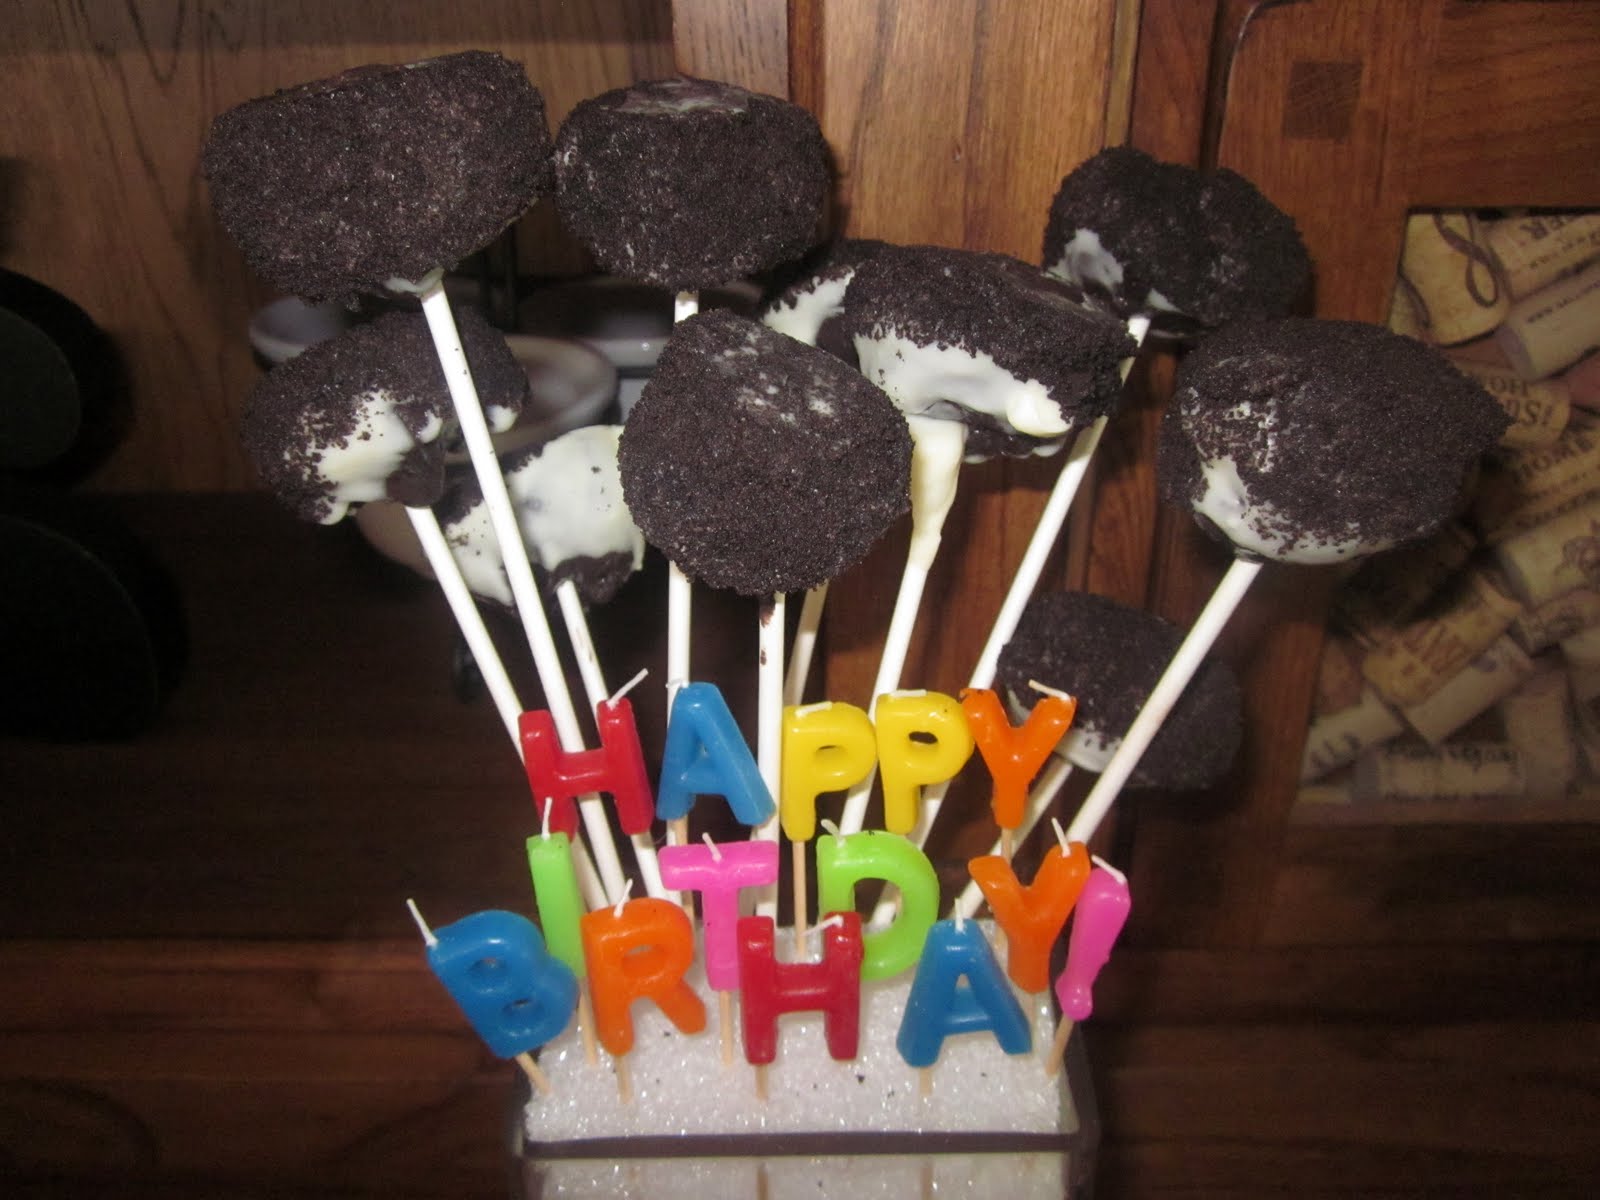
Oreo cheesecake pops
So cake pops are all the rage now from what I see online. I never really had a desire to make them until I saw this though. It was listed on Foodbuzz's top 9 recipes of the day on Thursday. I had planned on buying a little birthday cake for my friend Christina, whose birthday celebration I will be missing due to being gone on RAGBRAI...eeeeeek, it's less than a week away!! Anyway, her and her boyfriend were coming for dinner Friday and once I saw the little amount of ingredients, and that it included oreos (I'm not a huge cookie freak but oreos just do it for me), I decided I had better give it a shot. Besides, if I screwed it up, I could just go with my original plan and buy a little cake on the way home from work on Friday. Always plan for failure...good logic, huh? Here's what you need...
1 package of Oreo cookies
1 (8 oz) container cream cheese (I used fat free)
1 package white chocolate wafers or chips
lollipop sticks
styrofoam block
Take 5 of the oreos and put them in your food processor....grind these to a fine crumb, you won't even be able to see the white middle part anymore. Set aside.
Take the rest of your cookies, break them up into pieces and put them into the food processor with the cream cheese. Process until well blended...this will be your "cake". Put the mixture in the fridge for an hour.
After it's chilled, mold the dough into one inch balls, and put them back in the fridge for 20 minutes (I put them in the freezer for half that time). One suggestion: Do remember that there is a blade in the bottom of your food processor bowl when you are scraping the bottom with your fingers to get all the chocolate love out of there. I sliced myself quite well and Justin had to finish balling the cakes up!
While the balls are hardening up (hehe, yes I have the humor of a 5th grader), melt your white chocolate in a double boiler. If you do not have a double boiler, like me, you have to improvise. Use two saucepans and put an inch or more of water in the bottom of the larger one. Put your chocolate in the smaller one, and set it inside the one with the water. Put your burner on high and let the bottom pan boil on high to melt the chocolate in the top pan. DO NOT try to melt the chocolate on direct heat, you will scorch and ruin it....trust me. I learned that lesson the hard way a few years ago! Make sure you watch your water level and don't boil all the water out too....
When the chocolate is melted, get your balls out of the fridge and put lollipop sticks into the center of each one. The smaller ones worked better than the larger ones, for future reference.
Dip the solid cake pops into the melted white chocolate and then dip in the ground up oreos that you set aside. Put the pops in the freezer for 2 hours, then stick them into the styrofoam in a vase or other serving dish. And now you have a little bouquet of cake balls :)
As you know, I am not a huge dessert person but these were mmmmmmmmmm! HAPPY BIRTHDAY, CHRISTINA!!
1 package of Oreo cookies
1 (8 oz) container cream cheese (I used fat free)
1 package white chocolate wafers or chips
lollipop sticks
styrofoam block
Take 5 of the oreos and put them in your food processor....grind these to a fine crumb, you won't even be able to see the white middle part anymore. Set aside.
Take the rest of your cookies, break them up into pieces and put them into the food processor with the cream cheese. Process until well blended...this will be your "cake". Put the mixture in the fridge for an hour.
After it's chilled, mold the dough into one inch balls, and put them back in the fridge for 20 minutes (I put them in the freezer for half that time). One suggestion: Do remember that there is a blade in the bottom of your food processor bowl when you are scraping the bottom with your fingers to get all the chocolate love out of there. I sliced myself quite well and Justin had to finish balling the cakes up!
While the balls are hardening up (hehe, yes I have the humor of a 5th grader), melt your white chocolate in a double boiler. If you do not have a double boiler, like me, you have to improvise. Use two saucepans and put an inch or more of water in the bottom of the larger one. Put your chocolate in the smaller one, and set it inside the one with the water. Put your burner on high and let the bottom pan boil on high to melt the chocolate in the top pan. DO NOT try to melt the chocolate on direct heat, you will scorch and ruin it....trust me. I learned that lesson the hard way a few years ago! Make sure you watch your water level and don't boil all the water out too....
When the chocolate is melted, get your balls out of the fridge and put lollipop sticks into the center of each one. The smaller ones worked better than the larger ones, for future reference.
Dip the solid cake pops into the melted white chocolate and then dip in the ground up oreos that you set aside. Put the pops in the freezer for 2 hours, then stick them into the styrofoam in a vase or other serving dish. And now you have a little bouquet of cake balls :)
As you know, I am not a huge dessert person but these were mmmmmmmmmm! HAPPY BIRTHDAY, CHRISTINA!!
Subscribe to:
Posts (Atom)