Thursday, April 21, 2011

Swordfish and steak kebabs

Walking around Menards last year, we came upon a section of grilling utensils and thought we would use a kebab set a ton....turns out we didn't.  Like never used them once in the last year.  Better late than never I guess, these will get used a lot more in the months to come.  Kebabs are perfect since you dont have to make any sides if you don't want to, everything you could want is included.  Besides, grilled onions and tomatoes are the shizz, I don't care who you are. 

So I had some swordfish in my freezer that I was trying to figure what to do with when I came upon this marinade recipe.  I had some sirloins that were thawed for salads too, and decided that in case the swordfish didn't work out, they would be a great backup.  Pictured below are the steak kababs (mind you, I took these apart and cut the potatoes up more after this picture was taken so they would get done in time with the meat):


Every meat likes a marinade and I LOVE these Lawry's brand 30 minute marinades.  The baja chipotle is perfect for grilled pork chops, the caribbean jerk is great for seafood, and the balsamic garlic is awesome on chicken.  The one I used on these bad boys was the steak and chop with garlic though....this link shows a picture of the bottle since I forgot to take one.  They have a huge selection of these at any Hy-Vee...


Now for the main event, the actual swordfish.  I used the same veggies on both the steak and the swordfish kebabs: potatoes, onions, cherry tomatoes, and jalopenos (until I ran out).  Next time I will add full mushrooms as well.  Pretty easy to load them up, the only thing you have to be careful of is not cutting your potatoes too thick because they take the longest to cook.  You don't want the meat overdone and the potatoes still hard in the center so make them pretty thin, and make your meat chunks decently thick, like so (these are all pre-marinade):


This marinade was pretty simple, and I had all of the ingredients in my cupboard.  I don't have the recipe in front of me so the amounts might be a little off but I don't think they matter too much anyhow, as long as you get it all in there.  If you want to go the simple route you could use the Lawry's carribean jerk marinade I mentioned above instead of whipping this together. 

1/2 cup lemon juice
2 T olive oil
1 teaspoon salt
1 teaspoon pepper
1 teaspoon paprika
1 teaspoon cumin
1teaspoon crushed red pepper
1/4 cup diced onion
1 garlic clove minced (I used 2)

Mix together and it should look like this:


Pour the mixture over the kebabs and let them marinate for at least 30 minutes.  I made these on Sunday this week (go me...I havent cooked once this week and we've had homecooked meals each night!) and left them in the fridge to grill after my long run on Wednesday night. Keep the grill on the lowest setting possible so they don't cook too fast, and flip them every 10 minutes or so to keep them moving.  It took about 30 minutes or a little more to get them all the way done.  Sidenote: skewers are hot when they are on the grill (derrrrr) so turning them with your fingers results in the loss of your fingerprints....not that I know from experience or anything :)

Justin was a little nervous about the swordfish since we'd never tried to make it at home before but he warmed up to it quite nicely.  The first bite was a little fishy but I think it was just that piece because I actually liked the swordfish better than the steak, which is a feat!  Swordfish is a very substantial fish, it feels heavier than normal fish so it makes you full but is just as good for you.  I was told these are "make agains for sure" so there's the verdict....two thumbs up!  Enjoy!


I estimate the swordfish kebabs at 250 calories per stick and the steak version at 300-350 calories per stick, depending on what cut of beef you use.


Pin It


Wednesday, April 20, 2011

Crockpot ranch pork chops

I know some people do the Wordless Wednesday thing on their blogs, I would love to try it but it's just not my style to keep my mouth shut, you all know that!  Anyway, this recipe is short, sweet, and to the point so it won't take much reading on this hump day for you to get through it. 

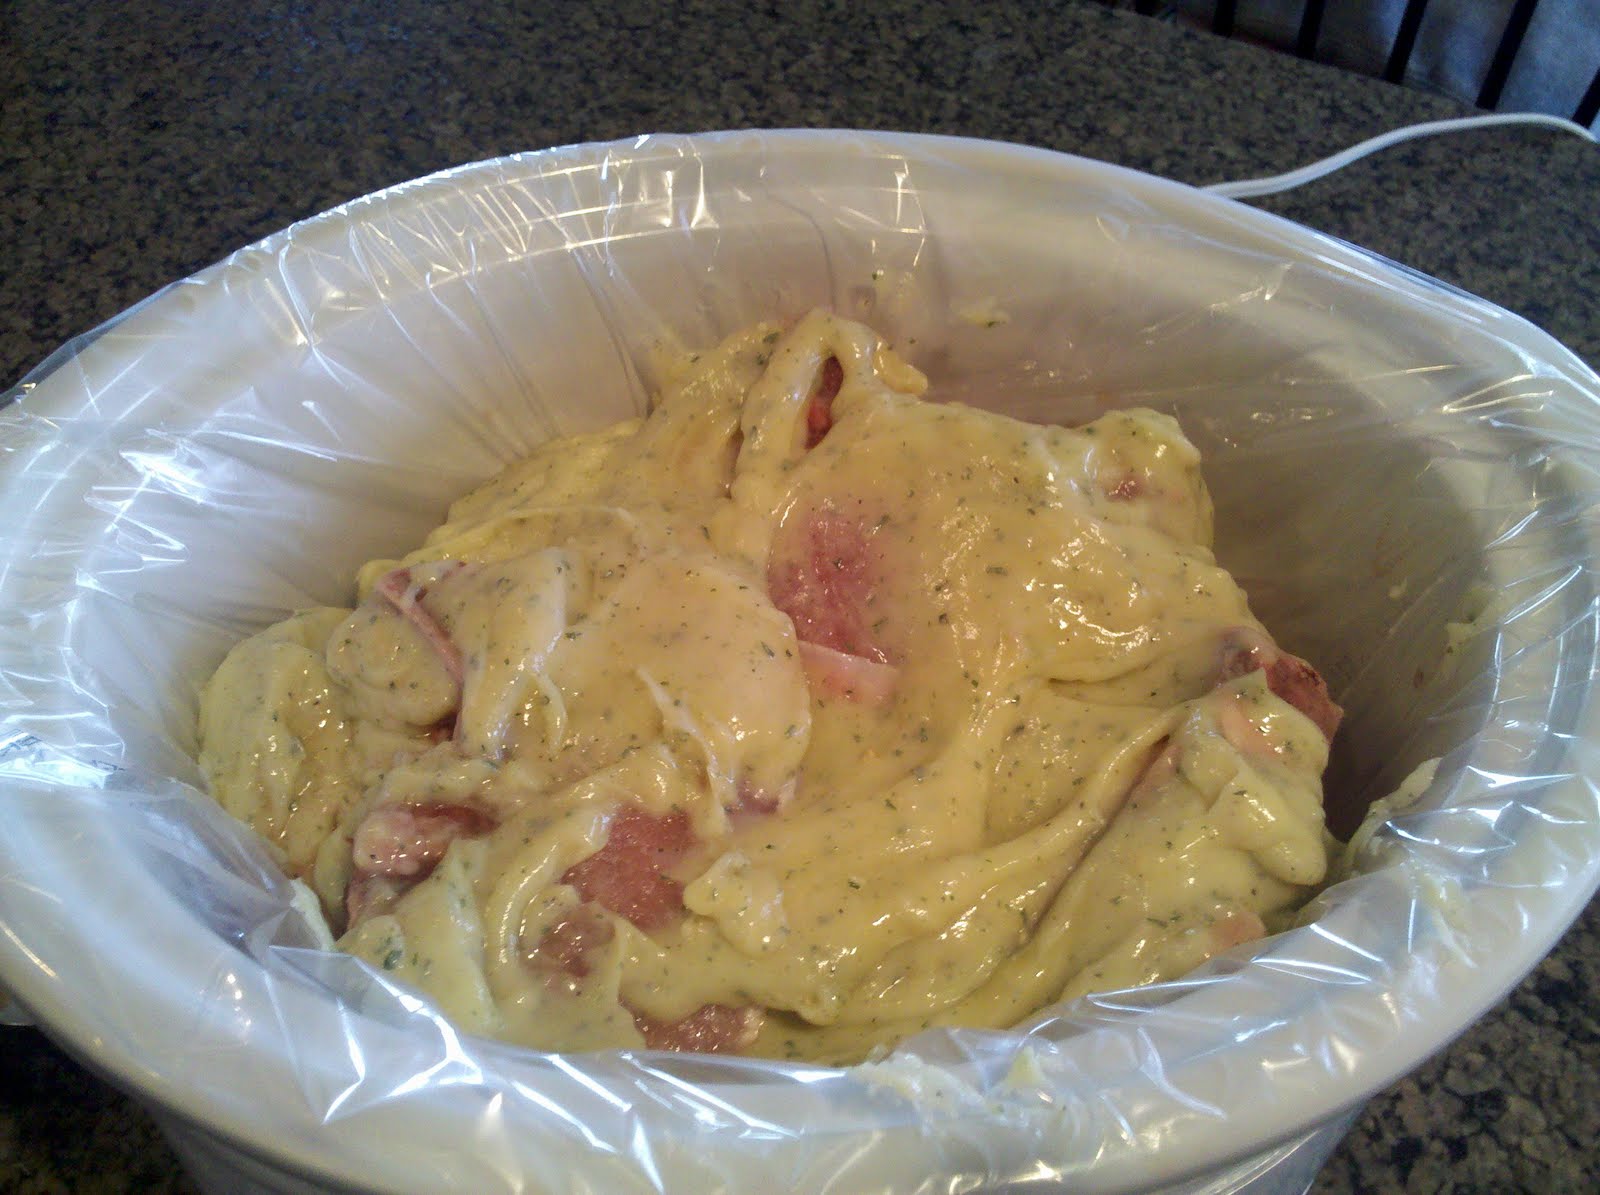
Below I pictured the crockpot, with a crockpot liner in it, and 6 pork chops thrown inside it.  In the bowl below it, I mixed one can of 98% fat free cream of chicken soup with one dry ranch dressing packet.


Pour the mixture on top of the crockpot pork chops like so....


Cover and cook on high for 3 hours. Or if you want to do what I did, put it in the fridge on Sunday to have Justin start for you for dinner on Tuesday night while you're at boot camp. 


Drumroll, please.....and here you have it.  Crockpot ranch pork chops with absolutely no effort whatsoever. Whoever figured out that pork chops stay juicer in the crockpot than the grill deserves a medal, these were muy bien.  I used my trusty Uncle Ben's microwave rice steamers (after 90 seconds one bag is enough for 2 people to have long grain wild rice for dinner), and thawed some frozen sweet corn bags I have in freezer bags with 2 servings in them, and dinner is served.  I will share the sweet corn recipe when I do our big freezer batch this summer at the end of sweet corn season....it's absolutely wonderful to have sweet corn in the Winter and not have to wait for it every year even though it's a bit of a chore to do the work.  I got the recipe from Justin's Mom and have done a boomsy sized batch (4 dozen ears) for the last 2 years, which seems to get us through to the following Summer.

Just so you know I estimated (and I usually estimate on the heavy side to be safe) the plate pictured above at 550 calories...not bad for the biggest meal of the day.

Tuesday, April 19, 2011

Baked ziti


This was a recipe I got from a friend who got it from a friend of hers (thanks again, Amanda).  If you like pasta and are sick of making the same old lasagna or spagetti routine, this creamy baked ziti recipe is for you!  I substituted a few things to make it healthier, but it still seems very heavy and not diet-y if you have a dude or some kids that don't like lighter meals.  Here is the original recipe with my changes in parentheses:

4 cups - Ziti pasta, uncooked
1 jar (26 oz.) marinara sauce
1 can (14-1/2 oz.) diced tomatoes, undrained
6 oz. - Cream Cheese (I used fat free)
3/4 cup - Sour Cream (I used fat free)
8 oz - Shredded Mozzarella Cheese (I used 2% because fat free melts funny since its made of plastic.  I also didnt use this much cheese, only about half this amount)
1/3 cup - Parmesan Cheese (I used reduced fat)
2 Cloves - Garlic (minced)
1 Tb - Basil
1 Tsp - Oregano
1 Tsp - Salt/Pepper
1 lb - Italian Sausage (I used ground turkey italian sausage)
 
Cook pasta in large saucepan as directed on package. Remove from pan; drain and spray cold water on noodles to stop cooking. Meanwhile, brown sausage on stovetop.

Add marinara sauce, tomatoes, garlic, spices, cream cheese, and sour cream to noodle pan; cook on medium heat 10 min. or until cream cheese is melted and mixture is well blended, stirring frequently. Return pasta to pan, add sausage and mix all ingredients.


Pour 1/2 of pasta mixture on the bottom of a 9 x 13 pan. Next, add 1/2 of the mozzerella cheese and then the remaining pasta mixture. Top with remaining mozzerella cheese and parmesan cheese. I also threw some Italian seasoning and crushed red pepper on each layer, you know how we like it hot in the Stensland household. Cover and Bake at 375 for 20 min. or until heated through. By the way, this was a make ahead on Sunday and keep in the fridge until Monday night for dinner recipe....in case you want to give the pre-made cooking a try, this was perfect for it.  I absolutely love having dinners ready to throw in when I get home! And yes, I realize that makes me sound like I'm 80 years old....


I like to make my own garlic bread as I get the guilty feeling after eating the pre-made stuff.  You know the feeling.  The "wow, that was freaking good, I'm gonna have one more piece" feeling you get with good bread, quickly followed by the "Oh my god, I'm so full I want to unbutton my pants" feeling.  The spread they use on the premade stuff has 100 calories per Tablespoon as well as 13 grams of fat...yikes! Plus, this is cheaper even though it does take more effort than buying one and throwing it in the oven, but I think it even tastes better this way.  I just buy an Italian loaf at the store for $1.50 and cut it into slices, spraying each side with fat free/cal free spray butter, as well as sprinkling each side with garlic powder and stuffing some cheese in the middle of each when I put it back together.  Wrap that up in tin foil and bake for 15 minutes to get the crunchy outside, soft inside (which is the way I like it but do what please). 


Finished product pictured below.  This isn't one of my better food pictures, I should probably start using a camera instead of my phone for this but I will tell you this tasted way better than it looks here.  And holy crap are there leftovers! Im sure this could feed 6 adults pretty easily.  Enjoy :)


Garlic roasted potatoes and szecuan mushrooms

As usual, we had a fantabulously fat kid food packed Sunday dinner the week.  I've been loving the grill lately so I dug out one of the last packs of t-bones we had in the freezer from the cow we bought last year (gonna need a new one soon)!  I don't need to explain to you how to make your steaks, everyone has their signature step by step for the perfect pile of meat.  But the potatoes and mushrooms we had as sides were pretty yum-tastic so I thought I would share those with you.

The potatoes were something my mom found a while back and they are my fave for a fat kid meal even though they're a little pricey.  They are called baby dutch potatoes and they're little yellow buggers that I cut in half or quarter, depending on their size.  


Put them in the baking dish as pictured above, and mince some fresh garlic up (about 2 cloves if you love garlic like I do, believe me no vamps are ever coming my direction) to add to 2 T of butter and melt.  I pictured my little OXO cutter upper/mincer/life saver thingy that Mama K got me for Christmas one year...I love that thing for dicing up anything for salsa in the summer too. 


Anywho, after the garlic butter is melted in the microwave (keep an eye on that volcano waiting to happen), toss it with the potatoes in the baking dish and add parmesan cheese on top. 


Cover with tin foil and cook for 40 minutes at 425 degrees (stirring around randomly) before removing the foil and roasting for another 15-20 minutes without a cover.  I added rosemary to the potatoes this time because I've been on a kick with it lately....it's absolutely the perfect flavor for taters.  If you wanted to use olive oil instead of butter, I've done that before too (better kinds of fats), just drizzle a tablespoon on and shake it around before throwing in the oven.  And that's that with the potato part of the mix....

Next are the teriyaki mushrooms which are good on chicken breast, steak, anything you want flavored mushrooms on...I've been making these since college and perfected my course of action so you should def give these a shot next time you're grilling something that needs a little something more.  I will just picture the ingredients to the shrooms so you can go out and get them...I'm serious, do it.  :) 

In case you can't tell, there is lime juice, spray butter (best invention ever even if it is made of plastic, no fat and no cals), soy sauce, oregano, and the sauce of the Gods....szecuan stir fry sauce.  I use that stuff on my fresh green beans with sesame seeds and its got some kick to it but not too much....its one thing I always have on hand.


I would love to give you the amounts for all these ingredients but I don't have them. I squirt it on till it looks right, and then I taste them as they're cooking (I bet you can't cook them without tasting them anyway) and let them cook in a skillet on medium heat for 10-15 minutes to soak up all the flava.  If they need more heat, throw some more szecuan sauce on them but if they need cooled down, add more of everything else. You pretty much cant ruin these...

Of course you know the other side we had, our trusty Kraft mac and cheese.  Wouldn't be Sunday dinner without you, Kraft!  Pictured below is the one that did me in...I was so full after this, sweatpants weren't even comfortable! But that's what Sunday dinner is all about I guess...and no, I didnt clean my plate, but Sam did! :)

Friday, April 15, 2011

Crockpot buffalo chicken sandwiches

I know I say this all the time but this is one of the simplest recipes I've ever made.  I am a big fan of throwing something together and waiting for it to get delicious all on it's own accord with no more effort from me.  Thus, my love affair with my crockpot.  I have a fancy schmancy red one with a timer on it so I can set it to start when I want it to, although I will admit that I don't know how to run that function and Justin is in charge of manually pushing the start button most of the time.  He had a white one before we met, and his mom got me the coolest double crockpot EVER for Christmas this year.  So when we have parties, I load up my 4 crockpots with dips, wings, meatballs, ribs, whatever strikes my fancy.  Just wait till we start having parties this summer, and I will post some party foods on here as well....

Anyway, I got off track there...the meal I made last night was crockpot buffalo chicken sandwiches, which I got from the blog of a friend of a friend (thanks Amanda!).  This was such a hit that I think Sam (our dog) was upset that there were no table scraps whatsoever for him to devour like there usually are when the crockpot is out.  There's usually just enough in there to not want to waste but not enough to save, and he loves all the juice and drinks it like water so when he sees the crockpot, he knows he's got a treat coming.  Not this time.  Curt ate three, yes, I said three sandwiches and Justin ate two (mind you, one was on a brat bun and twice the size of the buns I had).  So after I took my one down, Sam was left with nothing but juice...but that's neither here nor there, the dog eats better than most people, it's not going to kill him to eat Kibbles for one night.

Here is the original recipe:

4- boneless skinless chicken breasts
1 packet - Dry Ranch Dressing Mix
1 - Small Yellow Onion(sliced)
4 TBs - Butter
10 oz bottle Buffalo Wing Sauce*
Bleu Cheese Crumbles
Provolone Cheese
Sandwich buns

I omitted the butter (don't tell Justin), as well as the bleu cheese crumbles, and used 2% swiss cheese slices instead of provolone and large wheat rolls.  Once you have everything, this recipe is easy as pie (or I guess you could say it's easy as a crockpot buffalo chicken sandwich, but pie is shorter).  Slice the onion up and layer in the bottom of the crockpot, layer the chicken on top of that, sprinkle the ranch packet on top of that, add the wing sauce on top of that.....and that's that (that was a lot of that's, huh?). 


Oh I almost forgot, I added about a cup and a half of diced celery to the mix an hour before all this was done cooking.  I've had buffalo chicken pizza with some crunchy celery on it before and it just made my day...so I thought some celery couldn't hurt.


Cook on low for 4-6 hours, and with 1 hour left of cooking time - shred the chicken, add the bleu cheese (optional) and/or celery (optional) and continue cooking for additional hour.  Here is the shredded chicken:


By the way, if you've noticed before, I buy crockpot liners to use every time I cook with one.  I've been to the point of wanting to throw out a crockpot and buy a new one before because the cruckas (no, that word is not in the dictionary but I'm sure all of you can imagine what I mean when I say it) was so baked on from some concoction....these were the answer from the crockpot gods! I had never heard of them until my friend Cynthia brought something over to our house in a lined crock before...its like a dream come true.  They sell them in the same aisle as ziplocks and saran wraps at most stores. I seriously have a few boxes at a time at home, like if something bad in the world would happen and all grocery stores shut down I would still have my crockpot liners.  They're that important. 

But I digress....I toasted the buns in the oven and in hindsight, I wouldn't repeat that step.  These are better with soft, untoasted bread to soak up the yummy (really the only way to describe it without slobbering to you) juices.  Throw a piece of 2% swiss cheese on there and BOOM:


In case you were wondering, the broccoli is just steamed with cracked pepper and salt, as well as the I Cant Believe Its Not Butter spray (calorie and fat free) since we were out of parmesan cheese.  That's about it....enjoy your weekend peeps!

I am heftily (is that even a word?) estimating each sandwich to be 400 calories but could be more like 350 depending how heavy you load it with chicken.

Pin It


Thursday, April 14, 2011

Roasted brussel sprouts

Have you ever wished your parents would've sat you down and force fed you crap you didn't like when you were a kid?  Me neither.  My parents actually did do that, which is why the tiny ledge inside the underneath of the dinner table had chunks of petrified meat and vegetables lodged in it until I found a piece one day when I was back from college and couldn't believe they didn't know I did that!  I guess I did get away with something when I was a kid...

Anyway, I never used to be a veggie person but now I crave them just as much if not more than meat.  Brussel sprouts are my most recent discovery and I can't believe I've gone this long in life without them! In Mama K's defense, Big Dan didn't like them either so she wasn't going to force 3 people to choke them down.  I made brussel sprouts to go with the chicken last night but I love them so much I thought they deserved their own post.  I was nervous to try them the first time (they just sound like a scary veggie), had no idea how to prepare them, but I now could eat them every night of the week.  If you've never had them, or never had them how I'm going to tell you to make them, you have to at least give them a shot!

Last night I took the easy way out, I didnt want to waste much time (as I said, I am arm eating hungry when Im done with my long run of the week).  So I drizzled a Tablespoon of olive oil on them (covering the pan with my trusty Pam before hand so they wouldn't stick), threw on a bunch of fresh cracked salt and pepper, and some thyme. 

By the way, as you've seen in plenty of posts, I use disposable tin baking dishes a lot.  A HUGE bag of them was left at the house (undoubtably purchased at Sam's or Costco) after a party we had and I started using them.  I sometimes wash them out and keep them if there's not to much sludge baked on too, so I'm not totally un-green. There's no going back.  Cutting down that much on dishes during the week is a must, especially when the dishes I'm saving myself from are the ones that are baked with crud from something I made in the oven and the dishwasher doesn't begin to scratch the surface on.  Invest in these, they will make you happy.


Toss them around a little bit and put some tin foil on top before throwing them in the oven to roast for 15 minutes.  Take them out and remove the tin foil, toss them around a little more to pick up the spices and the olive oil, and throw them back in the oven for 5-10 minutes and you are good to go.  I swear they taste hearty enough I could eat them for a whole meal, and that's saying a lot for this carnivore.  Take them out, and serve!


If you have a bit more time....I have a recipe from a friend from high school named Bert who works at Prime Steakhouse in the Bellagio in Vegas (shoutout to my homie).  He sends me pics of his food that make me want to quit my job and go to culinary school.  Anyway, I had mentioned on FB that I didn't know how to go about working with brussel sprouts and he came to the rescue.  These were amazing! 

First you cook some bacon (this is starting out well, isn't it).  It cant be turkey bacon becuase no grease cooks off of the fake stuff...this has got to be real down home sliced Wilber.  Toss the sprouts into the bacon grease after you take the bacon out of the skillet to cool off.  Saute them until they are starting to brown up.  Then you get a Pam'ed up baking dish and throw them in there with the bacon all ripped up in smaller pieces.  Flavor with cracked salt, pepper, and thyme and roast for 10-15 minutes at 400 degrees.  This cooking method of frying veggies in bacon grease should be nowhere near a skinny kid recipe blog but these are too good not to share.  He said to add roasted pears as well but I've never gotten that far....here are the bacon fried lovelies that make my mouth water just with the thought of them:


If you're calorie counting, I would stick with the first method of sproutology...I promise they are just as good! Now go forth, and try a new veggie!

Cream cheese and jalopeno stuffed chicken breast

With the craptastic weather on the horizen, I figured I had better get one more use of the grill before this (don't say it out loud or it may come true) stupid snow crap possibly hits us this weekend.  Talk about ruining a girl's mood...I'm all Springed up and Mother Nature has to knock me on my arse!

This is a skinny version of chicken grillers I used to get all the time at HyVee, they are called Cowboy grillers (maybe Cowgirl grillers?) and I would get them pre-made, throw them on the grill and love them to pieces.  Then I got the nutrition info and wanted to shoot myself...I thought chicken was healthy??  Tricky poultry got me that time...

So I decided I would make a similar version myself with less of a calorie bomb on my waistline.  You only need a few ingrediants:

Jalopeno cream cheese stuffed chicken breasts:

1 package turkey bacon (This stuff is the bee's knees, but you have to get the right kind...has to be Oscar Meyer, no Jennie-O, its horrid! Ive even been able to switch the guys BLT's to turkey bacon with no complaints in the summer!)
4-6 chicken breasts
1 container fat free cream cheese
1-2 fresh jalopenos
toothpicks

Quantities depend on how many people you are serving.  For a regular sized chicken breast I will use two pieces of turkey bacon, and one container of cream cheese will get you plenty of filling for 4-6 full size breasts depending on how liberal you are with it. If you're down with the burn, use two minced jalopenos.....if you're a wuss with heat, use one (it really isn't that hot with just one jalopeno). 

These are pretty simple.  Use a fork to mix the diced jalopenos and cream cheese in a bowl like this:


Mix well so you dont get all the jalops in one bite!  When I did this, I used smaller pieces of chicken since I was using what was leftover from another recipe.  I only used one piece of bacon for each since they were so tiny.  Lay your bacon out, put the chicken on top of it and pound it out with a meat hammer to flatten it (holds more cheese this way, giddyup!) out on the table like so:


Go back to the cream cheese mixture and spread it liberally, or if you're not a creamy cheesy person then apply conservatively and don't ever come to eat at my house!


Now for the rolling.  This gets sort of messy because the cheese squirts out the side, your fingers are chickeny and cheesy, and its just an all around mess on the counter (dont worry, its worth it).  Start at one end, tuck in, and roll up.  Secure with 2 toothpicks so it doesn't fall apart on the grill and you're good to go.  I made these the night before and stored them in the fridge since I knew I had my long run the next day and wouldn't want to fudge around with making food when I was ready to start chewing on my arm from being so hungry.  Here are a couple all ready to go:


Throw them on the grill when you're ready but know that they don't take long, and be sure to KEEP YOUR EYE ON THEM.  Funny story: I had a bunch of friends out for dinner last Spring, made a metric crap ton of these things, threw them on the grill and went inside to finish with the other food.  Came back out, flipped them and texted the guys to come in from the shop, food would be ready in 5 minutes.  They thought I had started the house on fire and came running up the deck.  The cheese gets so hot it will start leaking into the grill and the flames just engulfed the chicken, burnt it to a crisp. The girls said Casey's pizza was good that night but I was disappointed in no one getting to try my creation.  Lesson learned...watch these little bad boys, they will go up quick!  Finished product:


This is on our regular rotation in the summer but sometimes I get a hankering for them when I dont want to go out and wipe the snow off the grill...so I have done them in the oven.  Just use the all powerful Pam so it doesnt stick and bake at 425 degrees for 30 minutes or so (you'll be able to tell when the chicken is done by color).  Everything is better on the grill but the oven works just fine if you're in a bind!