Friday, March 30, 2012

Cheese ravioli

Remember when my girlfriends and I got together to make homemade ravioli?  Yeah, this was way easier. In fact, if I were a betting woman, I would guess that I never attempt to make the dough and do all the work to make the stuff from scratch ever again. Enter wonton wrappers....my hero! I couldn't believe how noodle like the wontons turned after being boiled, it was like magic.  So anyway, if you want to do homemade pasta but don't have 2 other people on hand to help pull it through the machine, or 3 hours to get it all cut up correctly, or just don't have the ingredients....use wonton wrappers and tell everyone you made them from scratch...it'll work, I promise.

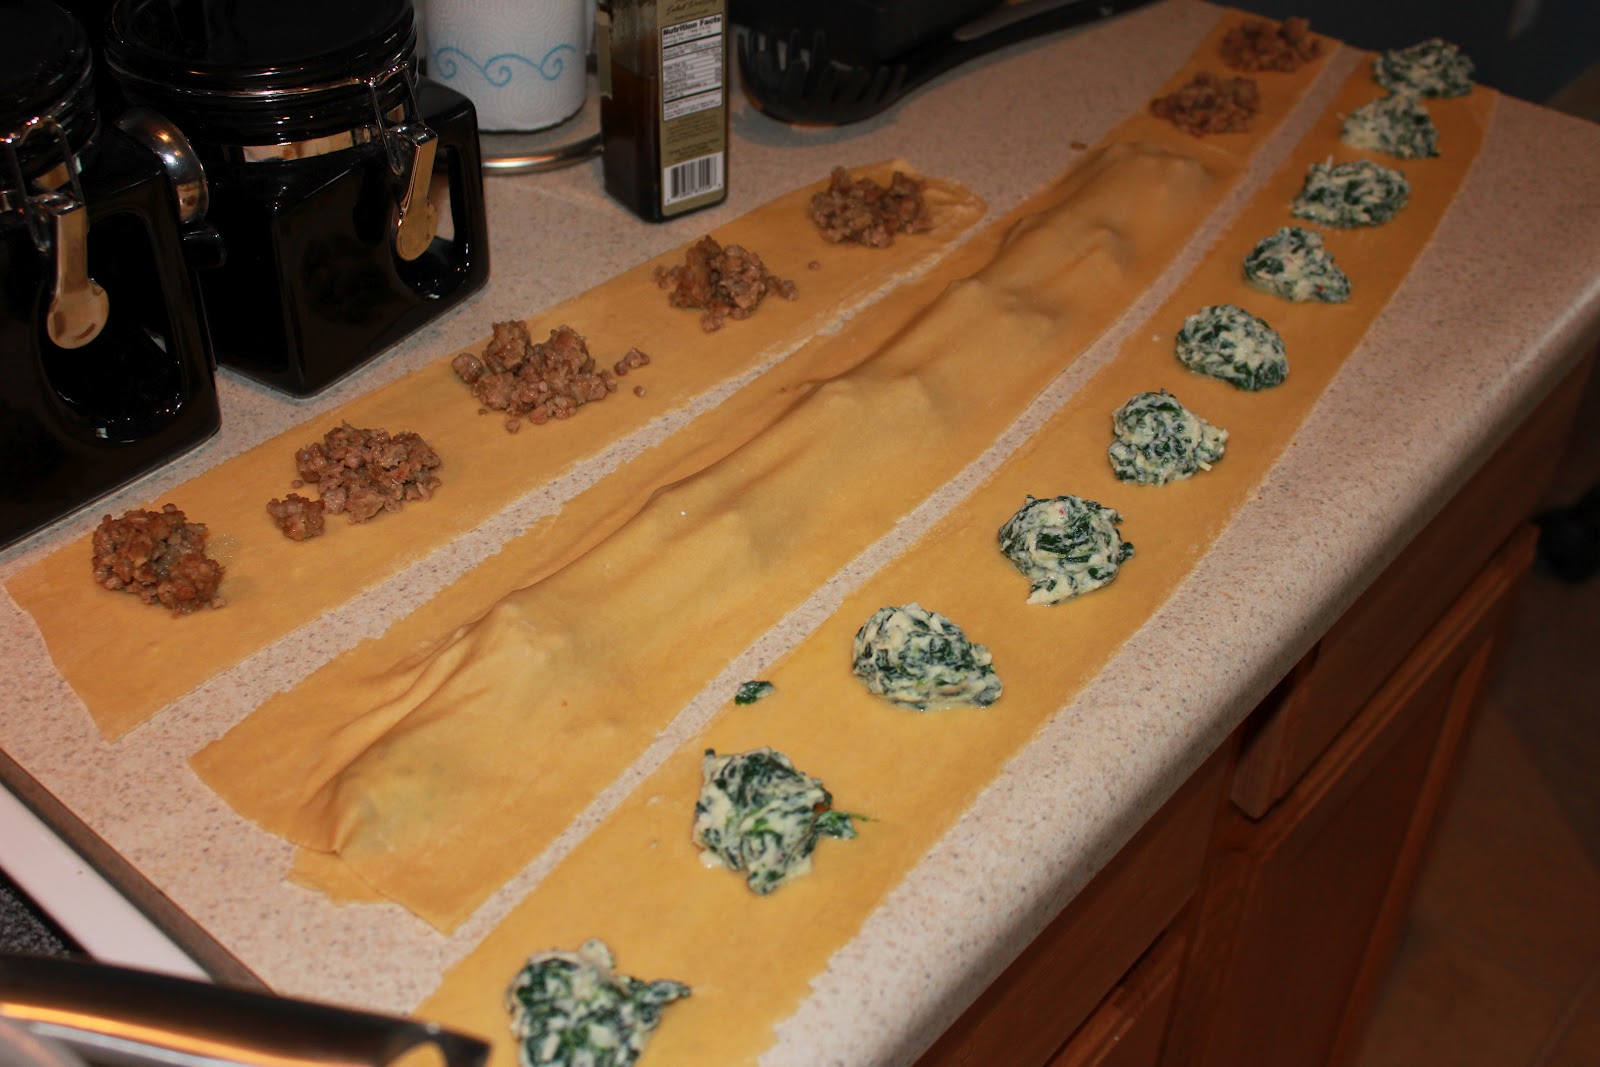
I just laid them out on the table and assembly lined the crap out of them! The mixture I used was all the cheeses I had in the fridge at the time since we enjoyed the cheese ones the best when we made them at Michelle's:

1 container cream cheese
1 package fresh mozzerella, diced up
fresh grated parmesan (however much looked like enough)
1 container skim ricotta

Mix it all up and dallop onto the wonton wrappers like so...


Then use a pastry brush, or a basting brush (not sure what they're supposed to be called but it's just a brush I use to brush things on in the kitchen), dip it in water and spread it on the top side and the right side of the wonton wrapper so the hold is secure when you shut up your raviolis.  We don't want that filling creeping out the sides while boiling, now do we?!  By the way, while you're preparing the raviolis I would start my water boiling in a large pot. Fold them over and push to secure like so....


I bagged enough for a meal for Justin and I to throw in the freezer so that next time I want homemade ravioli, it's just there to throw in and boil! More kitchen magic :)


Boil your noodles (in water that is rolling) for 5 minutes or until the color starts to change, you will be able to tell.


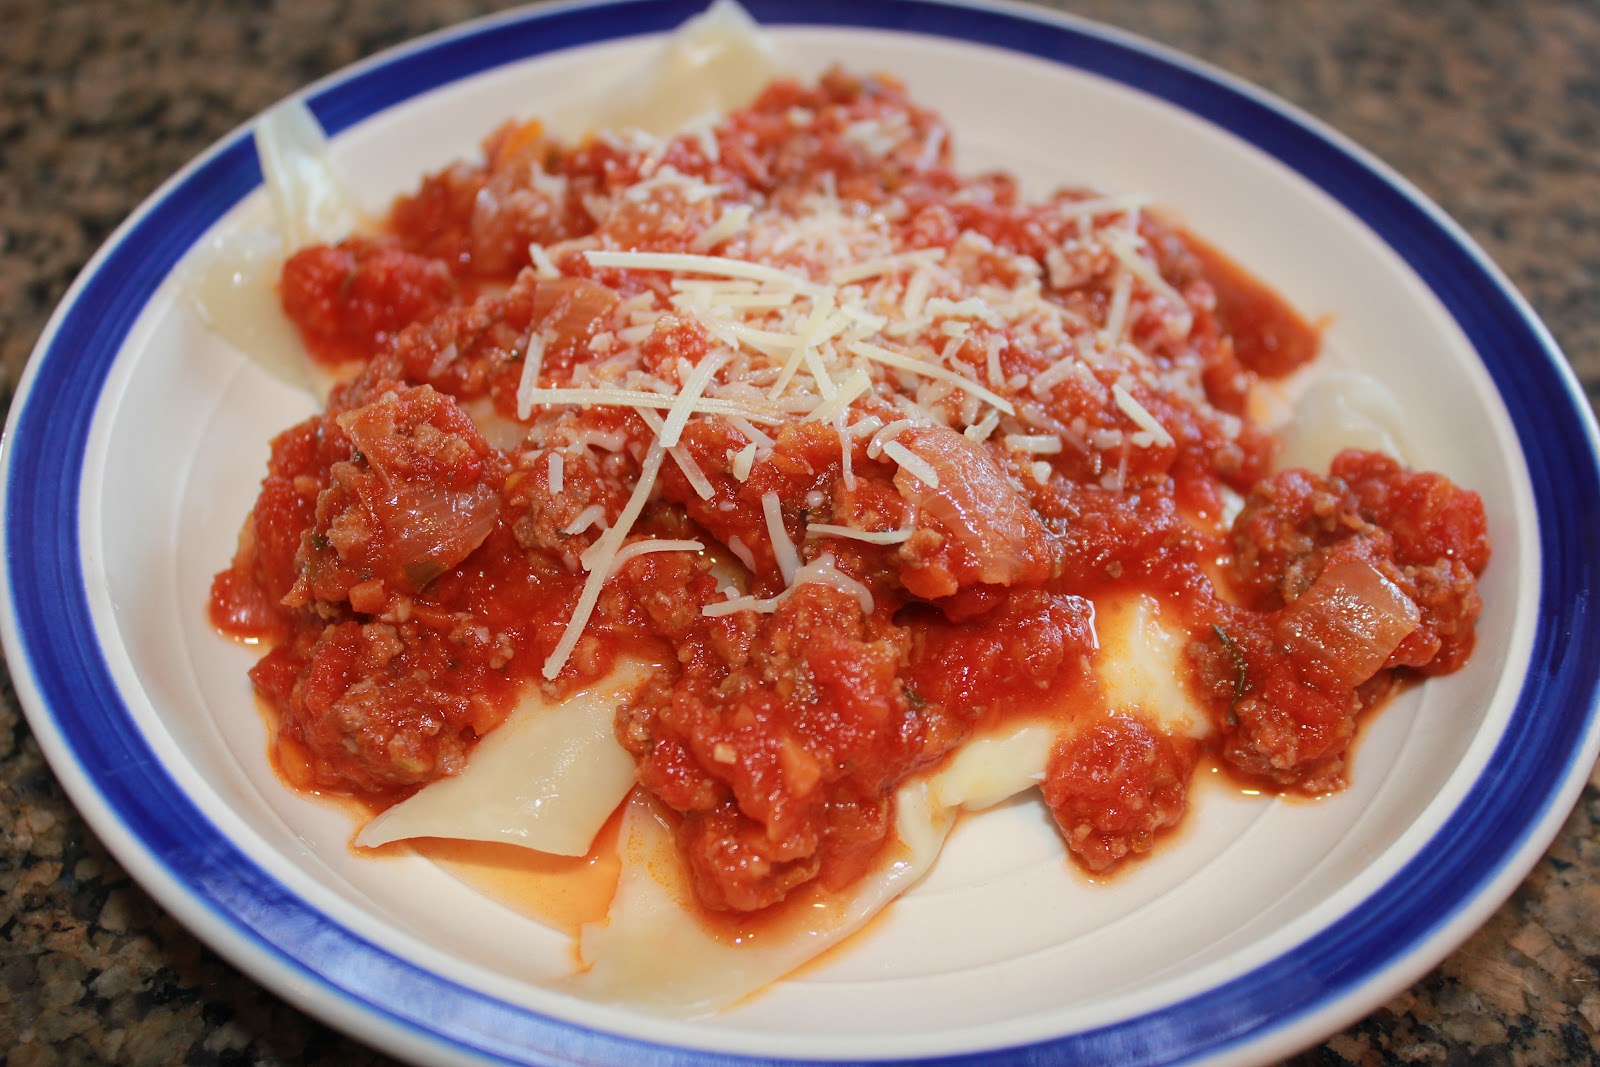
I made these on a Saturday and just happened to have all the stuff on hand to make the bolognese sauce that has my heart right now....it simmered on the stove for 5 hours that afternoon. You could use the pesto alfredo cream sauce we made last time if you want to go meatless, it's very quick and has yum to the max. Served with a little fresh parmesan on top and mmmmmmmmmmmmmmmm.  That's the only word to really give you the idea of how the cheesy stuffing melts with the soft noodles which meshes with the simmered sauce when they're all fresh off the stove. Really...you owe it to yourself to try this sometime. You'll never be able to look at Chef Boyardee's ravioli again!

Pin It


Thursday, March 29, 2012

Crockpot philly sandwiches

I've never made Philly sandwiches at home, although I do love them in restaurants. I've had awesome turkey philly's too, I wonder if this would work with the leftovers from the 28 lb turkey we cooked for our friends Christmas last weekend (Christmas in March is the best!)....I may have to give that a shot!

Mama Cynthia brought this over for dinner a couple of weeks ago so we could discuss bachelorette party plans for me and so I could get some baby Greyson snuggles, of course. These were so good that we both kinda sat there after finishing our plates, and finally one of us says "I'll split another one with you"....both of us were thinking it but neither of us wanted to say it first.  Now that's a good sandwich...haha!

2 lb Eye of round steak cut into strips
2 Tbl butter melted
2 Green peppers
1 Red Pepper
1/2 onion
1/2 Cup water
2 tsp Beef boullion granules
1 Tbl garlic pepper blend
Salt to taste
Hoagie Buns
Monteray jack cheese

Combine steak, butter, onions, garlic-pepper blend, and salt in crock pot. Whisk together water and beef boullin granules in small bowl, pour into crockpot, cover and cook on low 6-8 hours. One hour before serving, add the peppers. Remove meat and peppers and pile it on the buns buns, add cheese and place under broiler to melt cheese.

When I make this next (because I know I will), I will probably omit the butter as I find butter in that quantity in recipes usually doesn't make a taste difference. Also, I would like to try chicken or turkey phillys as well...the possibilities are endless! Cynthia may have found me my new favorite crockpot meal! Please excuse the photos...I was too busy getting baby love to worry about my picture quality that night, but believe me these are a party in your mouth :)


Pin It


Wednesday, March 28, 2012

Crockpot italian chicken sandwiches

Quick post today! I'm not sure where this recipe came from but it's been one that's been in my pile to try for as long as I can remember.  I'm also not sure why I waited so long since we have all the ingredients on hand 99% of the time. Oh well, now I know :)

2 lbs boneless skinless chicken breast
1/4 cup parmesan cheese
1/2 cup olive oil
1 T sweet basil
1 T garlic powder

Dredge chicken in parmesan cheese and layer on the bottom of your crockpot. Combine all other ingredients and pour over the chicken. Cook on low for 6-8 hours. Once cooked, shred and enjoy!

I'm a horrible food blogger and didn't get a photo of this (that's the best part!), but that doesn't make it any less yummy! I usually like chicken to have some sort of a kick to it (like my favorite crockpot chicken recipe ever, the buffalo chicken sammies), but this had enough flavor that it didn't need any spice. I served with a piece of pepperjack cheese on a large wheat bun and it was delish!


Pin It


Tuesday, March 27, 2012

Italian sausage sundried tomato alfredo

Let me first say....this is not skinny kid food.  This is fat kid food to the core, but I couldn't not share our cheat meal for the week because it was sooooooo darn good! Best part about it, it was an accidental yummy throw together, using just what I had in my cupboards that night. Don't you just love stumbling upon awesome meals when you have no expectations!?

I usually do pasta for our cheat meal because we're both carb freaks...no wonder I have to hit the gym for Kosama all week! This bolognese sauce is my favorite at the moment because it's so easy and it makes the house smell spectacular all afternoon while it simmers....but sometimes you're just not in the mood for the standard red sauce, you know?

I spotted this light alfredo sauce in the cupboard and decided to build with that. Usually I just make fettucine and spice this sauce up with some chicken, broccoli, crushed red pepper, and cracked black pepper (the light variety of alfredo sauce needs some kick to give it flavor, as it is pretty bland on it's own). But then I spotted the sundried tomato pesto (which I've never tried and just bought on a whim) and thought that would mesh very well with the alfredo sauce....and the rest just fell together. 

Green chiles for a little heat, mushrooms because they belong in every pasta in my humble opinion, and italian sausage because it was the first meat that spoke to me when I opened the freezer door. I also bought a metric crap-ton (yes, that's a legit unit of measurement in my world) of wheat pasta at Costco a while back, so went with the penne rather than a long noodle...I was happy with all of these decisions.

1 jar light alfredo sauce
1 jar sundried tomato pesto
1 large can mushrooms
1 can green chiles
1 box wheat penne
1 lb italian sausage (could use turkey sausage if you have it on hand, which is what I will do next time)


Boil your noodles according to the package directions. Brown your sausage in a large skillet and add mushrooms and green chiles to cook for the last 3 minutes.  Add your pesto and alfredo sauce and allow it all to simmer on low for 15 minutes for the flavors to meld. I always add crushed red pepper to anything italian, and next time I would throw in a diced white onion for good measure. I threw the noodles into the skillet with the sauce and stirred for a few minutes....and BOOM, dinner's done!

Serve with garlic bread and fresh shaved parmesan if you have it, but any parmesan will do.  This recipe will serve 4-6 very hungry adults, as the leftovers fed Justin all weekend I was gone taking care of Big Dan.  This was a very heavy pasta compared to what I normally make (like the shrimp pomodoro or the light cajun chicken pasta) but the taste was out of the park, so I just couldn't stop! If you use turkey sausage, the actual calorie count on this would be lower than you would expect if you're using wheat noodles like I did, light alfredo sauce like I did, and pesto (which I explained the health benefits of when I made pesto shrimp angel hair)....so although it's not guilt free, it's not a guilt ridden dish. Enjoy it like we did!

Pin It


Monday, March 26, 2012

Chicken pot pie

One of my favorite gifts of all time (if not THE favorite) is a cookbook my mom gave me for Christmas maybe 6-7 years ago. It's not just any cookbook though...it's a family recipe cookbook, written in each of my family members' own handwriting, with their favorite recipes in it. It still sort of gets me choked up to see my Grandma Mary's handwriting in there since she passed away.  If the house were to start on fire, and I had one thing to grab...it would be this cookbook (as long as Justin had my cat), it's my prized possession.

This recipe came from the pages of that book, in the penmanship of my dad's sister, my Aunt Nicki Kratoska! I've made this on a regular rotation for quite a few years, and it's been one of my dad's favorites that I've made for him, he requests it when he comes to visit. So when I went back to Carroll a couple of weekends ago to help him recoop from his full knee replacement surgery since Mama K worked all weekend, of course I packed the ingredients for this comfort food to make for his recovery.

This is super, duper simple and has waaaaay more flavor than you would imagine having so few ingredients. If you're a pot pie lover, you seriously don't ever need to buy the premade ones again...these taste infinitely better and are much better for you. Make a bunch of these in pie tins and freeze them to pull out whenever...you'll thank me later!

Here's what you need:
Package of pie crust (2 crusts included)
2 large chicken breasts, baked and diced (I season mine with Lawry's, garlic powder, and black pepper)
1 can cream of chicken soup (low sodium and the 99% fat free kind for me)
1 large can mixed veggies (whatever you prefer)


Mix together the chicken, soup, and veggies and set your filling aside....


Roll your dough out into two sections, one for the bottom (a little bigger than the other), and one for the top of your pot pie.  Be sure to grease your pie dish so the crust doesn't stick. I estimate the size I will need and then place it in my baking dish, but I use my fingers to smooth the dough out to the exact size needed. Fill the pie crust with the filling you set aside, and then top with the other pie crust.  Roll the edges of the two pie crusts together so they are attached.


Throw in the oven and bake according to pie crust directions. Everything inside is already cooked so it just needs to warm, but the pie crust needs to be golden brown and not doughy.  Dig in!! This was Big Dan's personal pot pie so he ate right out of the pie plate, and I believe he got 3 meals out of it. This has a home cooked comfort food taste to it so I know you will love it as much as we do...enjoy!


Pin It


Friday, March 23, 2012

Twice baked cauliflower

It's not that often that I do this...but I'm posting something that I just ate last night.  You probably don't know that I've got at least a week's worth of postings all queued up and ready to rock at all times.....but I do. Every so often you come across a recipe that knocks your socks off to the point where you just to share it...and share it NOW!

I figured today would be a good day to share a new favorite recipe, for quite a few reasons. First, I'm in a splendiferous mood today as (obviously) it's Friday, we get to eat at one of my favorite restaurants tonight (go drool HERE), and afterwards we have tickets to the Hunger Games movie!! I haven't been this obsessed with a book series, well...ever. I realize I sound like a 16 year old girl but I read the trilogy in 1 week...I literally barely slept...so believe me when I tell you that Justin is just as excited to go to the movie as I am, for the sole reason that I will probably (he's hoping) shut up about it after tonight.

There's another reason today is special though, although it's just as geeky as the Hunger Games thing.  Today is the one year anniversary of this blog!! I started it on March 23, 2011 as sort of a fun little project, not planning on posting each day, and mainly for family and friends to read...and it's turned into this. This blog with 70 followers (the majority of which I do not know personally) and 99,000 views (which translates into like 271 views per day for the last year)....what happened?!  I know I'm not that interesting, and the food pictures I post are absolutely not up to snuff when I look at other food blogs, and all the recipes on here are not the best (some of them are terrific but others are not even good!)...so what happened?!

Whatever happened, I'm so glad that I decided to start this project.  It's more than a food blog to me, if I go back and read from last year to now, it's a chronicle of my life (and Justin's) over the past year. So much has happened that I've gotten to share on here (including this and this) and I've really enjoyed writing about everything I love and am thankful for, not just food (read here , here, and here).  Looking back, I can't believe how eventful a year it's been and how fast it's flown by!  Anyway, thanks to those who keep coming back and are enjoying the recipes and stories posted...be sure to comment when you try something, it makes it even more fun! And now....du du du duuuuuuuuuuuuhhhhhhhhh....twice baked cauliflower!

PLEASE don't run! I pinky swear this is something you want to try...and this promise is backed up by Jessi, who hates cauliflower and bacon (yeah, I know, who hates bacon??) and ate the crap out this just like I did! Do not be frightened :)

First off, you know I have a problem with taters...Big Dan used to call me "potato ass" when I was growing up because of the quantity of chips and fries I would eat as a kid. He gave me a healthy self esteem though :) So if I'm telling you that I could substitute this cauliflower for potatoes, you have to believe me as a potato connoisseur, YOU HAVE TO! This is fo sho going on my reg rotation, and if you're looking for a lighter way to make taters, it should go on yours as well...

I'm going to put the recipe here, but since it was my friend Mallory who made this for us (it was a Pinterest find from last week), I don't have much of the preparation photos....so head on over to this blog for the original posting and some gorgeous pics!

1 large head cauliflower
4 oz. low fat cream cheese (I used fat free when I've made it since)
1/2 cup low fat sour cream (I used fat free when I've made it since)
1/4 cup minced green onions (I didn't have any so I left these out)
1/4 cup freshly grated Parmesan cheese (If you only have finely grated Parmesan, use a bit less)
6 slices bacon, cooked until very crisp, fat blotted with paper towel and then crumbled (I used turkey bacon crumbles, only 20 calories per tablespoon)
1 cup reduced fat sharp cheddar cheese (I used Kraft 2% milk colby jack)

Instructions:

Preheat oven to 350F/180C. Cut out stem and core from cauliflower, and cut into small pieces. Cook in large pot of boiling salted water until cauliflower is tender, but not overly soft. Drain well and mash with potato masher, leaving some chunks. Mix in light cream cheese, light sour cream, green onion, Parmesan, and 3/4 of the crumbled bacon.

Spread evenly in a medium-sized glass casserole dish. Sprinkle with low-fat cheddar cheese and reserved bacon. Bake 30-35 minutes, or until hot and bubbly.


I didn't have my good camera with me at the time, so I apologize for the photos....but DANG they still look good don't they!?  Enjoy :)

Fat Stats:
I have this estimated at 680 calories FOR THE WHOLE PAN! Yeah, sometimes I don't like to mess around with servings...I just want to know what I'm signing up for if I eat half the pan  :)  I usually eat 1/4 of the pan of this when it's served (I have to hold myself back not to do more) which equals out to 170 calories of uber fat kid food tasting potatoes. This is seriously my new favorite recipe, hands down.


Pin It


Thursday, March 22, 2012

Baked parmesan chicken

I had seen this recipe floating around on Pinterest for awhile and wanted to try it (hellooooo...remember my "under 5 ingredients" fetish), but my desire was solidified when I read on a friend's blog that she made it and her hubby and her just loved it! Thanks Desiree! If you want to check out her blog...head on over HERE for yummy recipes, adorable craft projects, and updates on the DIY projects she's done recently preparing for the coming arrival of their first child!

4 chicken breasts
1/2 cup mayo (I used fat free)
1/4 cup grated parmesan cheese
4 T Italian bread crumbs

Since I only did 2 chicken breasts, I halved all the other ingredients as well...

Preheat oven to 425 degrees. In a small mixing bowl, combine the mayo and parmesan. Place the chicken boobs (that will never get old!) on the baking sheet and spread with the mayo micture. Sprinkle 1 T of bread crumbs over each chicken breast and bake for 20 minutes.


Overall, I thought it was good...I would maybe use light mayo instead of fat free next time to give it a little more flavor. I would like to eat more chicken breasts, but I have to dress them up somehow for Justin, and this just didn't do it for him. Oh, he ate it, don't get me wrong...I just got the "It's alright...." when I asked if he liked it. He's learned that we try so many new recipes that he doesn't have to worry about most things popping up in the queue again unless it was something we both WOW'ed about....so this probably won't be a make again unless I add some spices to the crumbs on top...maybe I will play with this one a little since it was SO easy!  Happy rainy Thursday....

Pin It


Wednesday, March 21, 2012

Pesto shrimp angel hair

As some of you know, I've been trying to recreate a pasta dish I had at a restaurant for quite some time now, and have come up with some very tasty delights during my endeavor...this is one of them. Actually, the original dish had absolutely no pesto in it, but what can really go wrong with pesto? I had some prepared pesto left over from the girls day where we made pesto alfredo cream sauce and decided to use it up in another insanely chow-able pasta dish...

Super simple, and although it's a little higher in calorie than I would like, pesto is olive oil based so it's a healthier fat (sort of like salmon).  I try to use olive oil rather than butter or cream, read here to see why. Now for the fun part....

Grab yourself:

1 package wheat angel hair pasta
2 containers prepared basil pesto (recipe for homemade pesto below)
1 container large cherry tomatoes
1 bunch asparagus
1 8 oz package fresh mozzarella cheese
1 lb shrimp (I used cooked)

If you want to make your own pesto (which I do when my basil plant is blooming all summer), here's how you do it:

1 container pine nuts (these suckers are pricey)
4 cloves garlic
3 cups fresh basil leaves
1/4-1/3 cup olive oil

Throw that into a food processor and blend until smooth!

Now that that's outta the way....let's get to the pesto shrimp angel hair pasta! Boil your noodles according to package directions. When there is about 4 minutes left, add your halved asparagus to the boiling water.  Meanwhile, in a large skillet, add shrimp, pesto, and tomatoes and cook while stirring continuously for 3-5 minutes. 


Drain the noodles and asparagus and add them to the skillet with the cheese and the sauce.  Stir to coat noodles completely with the pesto...and serve! Yep, that's it. You know how I do! :)

The tomatoes are amazing when you cut into them and they explode a little, the juice blends with the pesto and adds such a deep flavor to this pasta. It was almost better heated up after everything melded together! This makes a humongous batch of pasta, which I brought home for Mama K and I to eat for the weekend of Big Dan's surgery (he got special food made for him which will be posted later on) and she loved it just as much as I did! It was a little addicting to be honest...I'm not proud of how many bowls of this stuff I consumed...you know if the "favorites" tab is present below that it's a winner!
Pin It


Tuesday, March 20, 2012

Balsamic grilled bruschetta chicken

Again, we have mixed reviews in the Stensland household on the yum factor of this recipe. The basil, garlic, tomatoes, mozzerella concoction that makes up my most favorite flavor profile in the universe is one of Justin's least favorite tastes. Bummer for him, I can't give it up.  Don't get me wrong, he ate this just fine, so he considered it edible...he just made the same comment as usual..."basil makes everything taste like plants...it tastes like you pulled something from the garden and put it on my plate".  And that's a bad thing??  I personally love the taste of fresh food out of the garden....but to each their own. I absolutely ADORED this meal...so light, fresh, filling, and perfect...too bad for Justin his taste buds are whacked! I guess this will become one of those recipes I have to make for Michelle, as she has the same craving for all things basil-y like I do...

4 boneless skinless chicken breasts
1/4 cup balsamic vinegar
1/4 cup olive oil
fresh mozzerella cheese

4 roma tomatoes, diced
8 fresh basil leaves, diced
3 cloves fresh garlic, minced
1 T balsamic vinegar
pinch of salt

Put your thawed chicken breast into a container or bag with the olive oil and balsamic vinegar as a marinade overnight. Use a fork to poke holes in the chicken so it will absorb more flavor...

When ready to prepare, preheat a grill pan (or a Griddler if you have one) over medium heat on the stovetop. Spray with cooking spray. Cook 6-8 minutes and then flip the chicken.

While the chicken is cooking, mix together all the ingredients in the second group above to make a topping for the chicken. Toss gently to combine.


During the last few minutes of grilling, place slices of fresh mozzerella on top of the chicken to melt.


When chicken is done, put on a plate and cover with tomato mixture. If I weren't calorie counting right now, I would've followed the recipe and made this a sandwich by placing it between two pieces of garlic toast...but alas, it was WONDERFUL without the addition of the garlic bread.

Pin It


Monday, March 19, 2012

Homemade ravioli with pesto alfredo cream sauce

Every other month or so, the ladies and I get together to have a Saturday cooking afternoon....we spend the day chatting and catching up, drinking wine (for the non-pregos), and preparing an all day feast to dine on for dinner that night. The first couple of times we used my grandmother's pasta machine, and both meals have turned out fantastic! I don't know why I never tried fresh pasta before...but you can bet it's now one of my faves if I have the time to throw it together. We've discussed Mexican next time and making our own shells, etc...I love that I have such fun girlfriends :)

Ravioli dough:
2 cups flour
1 pinch salt
1 t olive oil
2 eggs
1.5 T water

Pesto Alfredo cream sauce:
2 T olive oil
2 cloves garlic, crushed
3 T prepared basil pesto sauce
2 cups heavy cream (we used milk)
1/4 cup grated parmesan cheese

Have a jar of marinara sauce for this as well, but keep it separate.

Egg wash:
1 egg
1 T water

Cheese ravioli filling:
1 (8 oz) container ricotta cheese
1 (4 oz) container cream cheese
1/2 cup shredded mozzarella cheese
1/2 cup shredded provolone cheese
1 egg
2 t dried parsley

Spinach ricotta ravioli filling:
1 lb fresh spinach
1 T salt
1 lb ricotta
1 egg
2 T heavy cream
4 T grated parmigiano reggiano
1/4 t nutmeg
pinch black pepper


Italian sausage ravioli filling:
1 lb Italian sausage, browned
1/2 cup shredded parmesan cheese


Mound the flour and salt together on a work surface and form a well. Beat the teaspoon of olive oil, 2 eggs, and water in a bowl. Pour half the egg mixture into the well, and begin mixing the egg with the flour with one hand while using your other hand to keep the flour mound steady. Add the remaining egg mixture and knead to form the dough.  Knead until dough is smooth (add more flour if it's too sticky), and then form the dough into a ball and wrap tightly with plastic. Refrigerate for an hour.


While the dough was resting, we prepared our fillings. Each was just mixing different ingredients into a bowl so we could spoon it onto the raviolis once our dough was done. Set those aside.

For the pesto alfredo cream sauce, heat 2 T of olive oil in a skillet over medium heat. Add the crushed garlic and pesto sauce and cook for one minute. Pour in the heavy cream (or milk), raise the heat to high, and bring the sauce to a boil. Reduce the heat and simmer for 5 minutes. Add the parmesan cheese an stir until it melts. Keep the pan warm until time to serve. Meanwhile, in a spearate saucepan, warm the marinara sauce over medium low heat. Start a large stockpot of water to boil.


Back to the pasta: Roll out the pasta dough into thin sheets no thicker than a nickel. To assemble the ravioli, brush the egg wash over all your sheets of pasta. Drop the filling mixtures on the dough (on the side brushed with egg) by teaspoonfuls about one inch apart. Cover the filling with the top sheet of pasta (egg washed side down), pressing out the air from around each portion of filling.  Press firmly around the filling to seal, and then use a pizza cutter or kitchen shears to cut the pasta into individual raviolis. We used a fork to seal the edges of each ravioli better and, of course, to make the quintessential ravioli marks around the pastas.


Drop the raviolis into the boiling water, and cook uncovered, stirring occasionally, until the ravioli float to the top and the filling is hot (4-8 minutes).  Drain well. 


To serve, put ravioli on a plate and top it with marinara sauce, and finally drizzle it with the pesto alfredo cream sauce. TO. DIE. FOR. I think the meat ones were the least favorite of the group, the cheese raviolis and the spinach ricotta raviolis were both awesome! The final verdict was, these were a great Saturday activity for our ladies group, but we won't be making them again anytime soon. They were A LOT more work than our original bout with the pasta maker when we did fettucine and bolognese sauce a couple of months ago. 


P.S.  Aurey tested, Aubrey approved.  :)

Pin It


Friday, March 16, 2012

Parmesan crusted tilapia

I suppose I can throw you Catholics a bone and give you a fish recipe since it is Friday during Lent.  I made this a couple weeks ago (not due to lent, due to my love of fish) and it was superbly simple, quick, and yummy!  Happy Friday, all!

3/4 cup grated parmesan cheese
2 t paprika
1 T chopped flat leaf parsley
4 tilapia filets
olive oil, salt, and pepper

Preheat oven to 400 degrees.  In a shallow dish, combine the cheese with the paprika and parsley and season with salt and pepper. Drizzle the fish with olive oil and dredge in the cheese mixture. Place on a foil lined baking sheet and bake until the fish is opaque in the thickest part (10-12 minutes).


Pin It


Thursday, March 15, 2012

Diaper motorcycle

I had full intentions of making step by step instructions for this project and took photos throughout the entire thing....but then I realized it would be really counterproductive for me to basically mimic the instructions that I used from another blog, so I  will just send you over to Sweetaprils for the picture tutorial that I used to construct this little guy!

Amanda and I made one a few months ago for Cynthia's baby shower, and I loved the look of it so much, I couldn't resist making one for Kristyn's baby shower a month or so ago. All the items used to make it are completely usable for the coming baby (the baby sunglasses are to die for on an actual kid)...or you can use it as a nursery decoration, whatever floats your boat! I got tons of compliments on it, and they really don't take long once you have all the necessary materials (listed in the link above along with pictures and step by step instructions)....I think I had the whole thing put together in under an hour!


Pin It